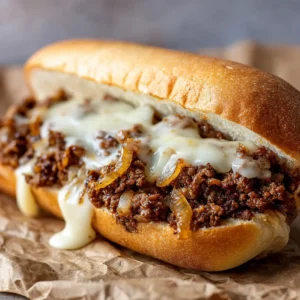
Get ready to meet your new favorite comfort food obsession: the Hawaiian Roll Grilled Cheese. This isn’t just a sandwich; it’s an experience. Imagine pulling away a soft, sweet roll from a cluster of others, its top a perfect golden-brown, glistening with a savory butter glaze and a sprinkle of fresh parsley. As you pull, a river of thick, gooey cheddar and mozzarella cheese stretches and oozes, promising an unbelievably satisfying bite. This is the ultimate pull-apart dish that combines the sweet and savory flavors we all crave into one easy, shareable meal.
This recipe transforms a simple concept into a show-stopping centerpiece perfect for any gathering, from game day parties to easy family dinners. It’s the kind of simple comfort food that rivals even a hearty Creamy Garlic Steak Tortellini for a spot in your weekly rotation. We’re leveraging the iconic sweetness of Hawaiian rolls to create a truly unforgettable grilled cheese experience.

Why This Pull-Apart Grilled Cheese Will Be Your New Obsession
This isn’t just another slider recipe. Here’s why it stands out:
- The Ultimate Cheese Pull: We use a specific blend of cheeses to create that picture-perfect, stretchy, and gooey cheese pull that is both visually stunning and incredibly delicious.
- Sweet & Savory Perfection: The subtle sweetness of the Hawaiian rolls perfectly complements the rich, savory flavors of the melted cheese and garlic butter glaze.
- Golden-Brown & Glossy Finish: The final brush of melted butter doesn’t just add flavor; it creates a beautifully glossy, toasted top that crackles slightly with every bite, just like you see in the photos.
- Crowd-Pleasing & Easy: Baked in one dish, these pull-apart sliders are incredibly simple to make and even easier to serve, making them the ideal appetizer or fun family meal.
The Key Components for Perfect Gooeyness & Golden-Brown Tops
The magic of this recipe lies in a few key ingredients that work in perfect harmony. Each element is chosen specifically to replicate the textures and flavors you see.
The Cheeses: A Duo for Ultimate Flavor and Stretch
For that glorious, oozy texture, we use a blend of sharp yellow cheddar and low-moisture mozzarella. The cheddar provides a bold, tangy flavor and classic golden color, while the mozzarella is the secret to that coveted, super-stretchy cheese pull.
The Bread: Sweet, Soft, and Toasted to Perfection
Classic sweet Hawaiian rolls are the foundation of this dish. Their signature sweetness and soft, pillowy texture toast up beautifully, creating a perfect vessel for the molten cheese inside.
The Finishing Touch: A Glossy, Herby Butter Glaze
To achieve that irresistible glossy sheen, we brush the tops with a simple melted butter glaze infused with a hint of garlic. A final sprinkle of finely chopped fresh parsley adds a touch of color and fresh, herby aroma.
Essential Tools for Assembling Your Cheesy Masterpiece
You don’t need any fancy equipment to bring these amazing sliders to life. Here’s what you should have on hand:
- A 9×13 inch (23×33 cm) Baking Dish: A rectangular ceramic or glass baking dish is perfect for arranging the rolls tightly together.
- Serrated Knife: This is the best tool for slicing the slab of rolls in half horizontally without squishing them.
- Pastry Brush: Essential for evenly applying the melted butter glaze across the tops of the rolls.
- Small Bowl: For melting the butter and mixing the simple glaze.

Bringing Your Hawaiian Roll Grilled Cheese to Life: A Step-by-Step Guide
Follow these simple steps to create the ultimate pull-apart cheesy delight. We’ll focus on the sensory cues to ensure you get it perfect every time.
Step 1: Preparing the Rolls and Cheese
First, preheat your oven to 375°F (190°C). Carefully take the entire slab of 12 Hawaiian rolls and, without separating them, use a long serrated knife to slice them in half horizontally. You should have one large top piece and one large bottom piece. Place the bottom slab into your greased baking dish. For the cheese, using freshly shredded blocks will give you the best melt and stretch, so take a few extra minutes to shred your cheddar and mozzarella.
Step 2: Assembling the Pull-Apart Sandwiches
Spread half of your melted butter on the cut side of the bottom slab of rolls. This creates a barrier to prevent sogginess and adds flavor. Now, layer on the cheese. Start with the shredded cheddar, spreading it evenly, and follow with the mozzarella. Place the top slab of rolls back on top.
Step 3: The Golden-Brown Bake
Melt the remaining butter and mix in the garlic powder. Brush this glorious mixture all over the tops and sides of the rolls. You should hear a faint sizzle as the warm butter hits the cool dough. Bake for 15-20 minutes, or until the tops are a deep golden-brown and you can see the cheese inside is fully melted and bubbling at the edges.
Step 4: The Final Glossy Glaze
As soon as the rolls come out of the oven, sprinkle the finely chopped fresh parsley over the buttery tops. The heat from the rolls will release the parsley’s aroma. Let them cool for just a minute or two before serving hot, encouraging everyone to pull one away and marvel at that incredible cheese pull.
Culinary Secrets for Flawless Hawaiian Roll Grilled Cheese
Keep these pro tips in mind for perfect results.
- Shred Your Own Cheese: Pre-shredded cheese contains anti-caking agents that can prevent it from melting into that perfectly smooth, gooey river of goodness. Shredding from a block is a game-changer.
- Don’t Separate the Rolls (At First): Slicing the entire block of rolls in one go makes assembly incredibly fast and ensures they bake together into a unified pull-apart dish.
- Watch for the Golden Cue: Ovens vary. The key visual cue for doneness is not just the time, but the color. You’re looking for a rich, even golden-brown across the entire top surface.
- Serve Immediately: The magic of the cheese pull is most dramatic when the grilled cheese is fresh and hot from the oven.
Storing and Reheating Your Cheesy Creations
While best served fresh, leftovers can still be delicious. Store any remaining sliders in an airtight container in the refrigerator for up to 2 days. To reheat, the oven or an air fryer is your best bet to restore some of the original texture. A quick bake at 350°F (175°C) for 5-7 minutes should do the trick.
I wouldn’t recommend freezing these, as the bread texture can change significantly upon thawing.
Perfect Pairings: What to Serve with Your Grilled Cheese Sliders
These Hawaiian Roll Grilled Cheese sliders are fantastic on their own, but they also pair wonderfully with a variety of sides to make a more complete meal. A comforting bowl of soup, like this Crockpot Crack Potato Soup, is a classic companion. For something lighter, a crisp Cucumber Ranch Crack Salad offers a refreshing contrast.
If you’re a fan of easy, cheesy, and crowd-pleasing dinners, you will absolutely love our viral Oven-Baked Cheesy Tacos. And for another sweet and savory favorite, this Honey Garlic Shrimp is always a winner!
Your Hawaiian Roll Grilled Cheese Questions, Answered
Here are answers to some common questions about this recipe.
Absolutely! Thinly sliced deli ham is a classic addition. Cooked, crumbled bacon or shredded turkey would also be delicious. Layer the meat between the two types of cheese for best results.
You can assemble them a few hours in advance. Prepare them up to the point of baking, cover tightly with foil, and refrigerate. When ready, remove the foil, brush with the butter glaze, and bake, adding a few extra minutes to the cook time.
Yes, other pull-apart style dinner rolls or slider buns will work. However, the unique sweetness of Hawaiian rolls is what makes this recipe so special and creates the signature sweet and savory flavor combination.
The key is to create a moisture barrier. Spreading a thin layer of melted butter on the inside (cut side) of the bottom slab of rolls before adding the cheese helps prevent sogginess. Also, be sure to bake and serve them relatively quickly after assembly.
A combination of low-moisture mozzarella and sharp cheddar is best. Mozzarella provides the amazing cheese pull and gooey texture, while cheddar adds a rich, tangy flavor and great color.
The Ultimate Hawaiian Roll Grilled Cheese Recipe
Now it’s time to get cooking! The full recipe below has all the precise measurements and steps you’ll need to create this cheesy masterpiece.
Hawaiian Roll Grilled Cheese: The Ultimate Pull-Apart Recipe
Ingredients
Equipment
Instructions
- Preheat oven to 375°F (190°C). Grease a 9x13 inch baking dish. Without separating the Hawaiian rolls, use a long serrated knife to slice the entire slab in half horizontally. Place the bottom slab into the prepared baking dish.
- Melt half of the salted butter (1/4 cup or 57g) and spread it over the cut side of the bottom slab of rolls. Evenly layer the shredded cheddar cheese, followed by the shredded mozzarella cheese. Place the top slab of rolls over the cheese.
- Melt the remaining 1/4 cup (57g) of butter and stir in the garlic powder. Brush this mixture evenly over the tops and sides of the rolls. Bake for 15-20 minutes, until the tops are golden-brown and the cheese is thoroughly melted and bubbly.
- Remove from the oven and immediately sprinkle with the finely chopped fresh parsley. Let it cool for a minute, then serve warm as a pull-apart dish.
Notes
Applying butter to the inside of the rolls helps create a barrier against sogginess.
Serve immediately for the most dramatic and gooey cheese experience.

Share Your Cheesy Masterpiece!
We can’t wait to see your incredible cheese pulls! If you make this Hawaiian Roll Grilled Cheese recipe, please leave a comment below and let us know how it turned out. Don’t forget to save this recipe to your favorite board on Pinterest and share it with your friends and family!