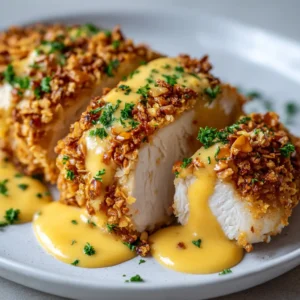
Say goodbye to the splatter and guilt of deep-frying without sacrificing an ounce of flavor or crunch. This incredible Oven Fried Chicken recipe delivers everything you crave: a shatteringly crispy, golden-brown crust and unbelievably juicy, tender meat inside. We’ve perfected the method to create a healthier version of the classic comfort food that’s baked, not fried, but tastes just as indulgent. Get ready to make this your new go-to weeknight dinner.
This isn’t just another baked chicken recipe. It’s a complete system for achieving that authentic fried chicken experience straight from your oven. By using a few simple but critical techniques, like a buttermilk marinade and a panko breading, we guarantee a flawless result every single time. It’s the perfect centerpiece for a family meal and impressive enough to serve to guests.

Why This is the Best Oven Fried Chicken Recipe
You might be skeptical that baked chicken can truly replicate the satisfaction of fried, but this recipe is designed to win you over. Here’s why it stands out from the rest:
- Unbeatable Crunch: We use a double-coating technique with Panko breadcrumbs, which are lighter and absorb less oil, resulting in a superior, long-lasting crispiness.
- Incredibly Juicy Meat: A simple buttermilk marinade tenderizes the chicken, infusing it with flavor and ensuring every bite is moist and delicious.
- Healthier Comfort Food: Enjoy all the sensory pleasure of fried chicken with significantly less oil and fat. It’s a feel-good meal in every sense.
- Simple, Accessible Ingredients: You won’t need any special equipment or hard-to-find ingredients. Everything you need is likely in your pantry right now.
The Science Behind the Crisp: Key Ingredients & Their Roles
Achieving that perfect crust in the oven is all about using the right ingredients. Each component plays a vital role in building the ultimate texture and flavor for our Oven Fried Chicken.
For the Chicken Marinade
- Chicken: This recipe works beautifully with bone-in, skin-on chicken pieces like thighs, drumsticks, or wings. The bone and skin help keep the meat incredibly moist during baking. You can also use boneless, skinless breasts, but you may need to adjust the cooking time.
- Buttermilk: The star of the marinade. The slight acidity in buttermilk tenderizes the chicken by breaking down proteins, resulting in exceptionally tender meat.
- Hot Sauce: This adds a gentle background heat and depth of flavor, not overwhelming spice.
- Salt & Pepper: Essential for seasoning the chicken from the inside out.
For the Crispy Coating
- All-Purpose Flour: This forms the base layer of our coating, giving the egg and breadcrumbs something to adhere to.
- Eggs: Acts as the binder, ensuring the crispy Panko coating sticks to the chicken throughout the baking process.
- Panko Breadcrumbs: The secret to a light, airy, and ultra-crispy crust that mimics deep-frying.
- Spices: A classic blend of smoked paprika, garlic powder, onion powder, and a pinch of cayenne pepper creates that iconic savory, slightly smoky fried chicken flavor.
- Melted Butter or Oil: Drizzling the chicken with melted butter or spraying with oil before baking helps the coating “fry” in the oven, achieving that beautiful golden-brown color and rich flavor.
Step-by-Step Instructions for Perfect Oven Fried Chicken
Follow these simple steps for a flawless result. The key is to set up your dredging station before you begin to keep the process clean and organized.

Step 1: Marinate the Chicken
In a large bowl, whisk together the buttermilk, hot sauce, salt, and pepper. Add the chicken pieces, ensuring they are fully submerged. Cover the bowl and refrigerate for at least 4 hours, or preferably overnight. This step is crucial for tender, flavorful chicken.
Step 2: Prepare the Breading Station
Preheat your oven to 400°F (200°C). Place a wire rack inside a large, rimmed baking sheet. This is a non-negotiable step! Elevating the chicken on a rack allows hot air to circulate underneath, ensuring the bottom gets just as crispy as the top.
Set up three shallow dishes. In the first, whisk together the flour and a pinch of salt and pepper. In the second, beat the eggs. In the third, combine the Panko breadcrumbs with the smoked paprika, garlic powder, onion powder, and cayenne pepper.
Step 3: Dredge the Chicken
Working with one piece at a time, remove the chicken from the buttermilk, allowing any excess to drip off. First, coat it thoroughly in the seasoned flour and shake off the excess. Next, dip it into the beaten eggs, ensuring it’s fully coated. Finally, press the chicken firmly into the Panko mixture, covering all sides completely.
Step 4: Bake to Crispy Perfection
Arrange the breaded chicken pieces on the prepared wire rack, making sure they are not touching. Drizzle the tops with melted butter or spray generously with cooking oil. Bake for 40-50 minutes, or until the chicken is golden brown, crispy, and cooked through. The internal temperature should reach 165°F (74°C) for breasts or 175°F (80°C) for thighs.
Pro Tips for the Crispiest Baked Chicken
Want to take your Oven Fried Chicken to the next level? These expert tips will guarantee success.
- Don’t Skip the Wire Rack: I can’t stress this enough. A wire rack is the single most important tool for achieving a 360-degree crispy crust. Without it, the bottom of the chicken will steam and become soggy.
- Press the Breading Firmly: When coating the chicken in the Panko mixture, press down gently but firmly. This helps the coating adhere and form a thick, protective crust.
- Don’t Overcrowd the Pan: Give the chicken pieces space on the rack. Overcrowding traps steam and prevents the chicken from crisping up properly. Use two baking sheets if necessary.
- Let it Rest: After baking, let the chicken rest on the rack for a few minutes. This allows the juices to redistribute, ensuring the meat is as juicy as possible when you cut into it.
What to Serve with Oven Fried Chicken
This dish pairs wonderfully with a wide variety of classic sides. You can go for ultimate comfort food or a lighter, fresher pairing.
For a classic Southern-style meal, serve it with creamy mashed potatoes and gravy, a side of mac and cheese, and collard greens. If you’re looking for an amazing side, these Crispy Garlic Butter Potatoes are a reader favorite. For a touch of sweetness, a piece of cornbread or our popular Honey Butter Skillet Corn is a perfect match.
For a lighter option, a simple green salad, some Roasted Cabbage Wedges, or steamed green beans work beautifully. This recipe is also fantastic for a picnic alongside a fresh pasta salad.
Storage and Reheating Instructions
While Oven Fried Chicken is best enjoyed fresh, leftovers are still delicious! Store cooled chicken in an airtight container in the refrigerator for up to 3 days.
To reheat and bring back the crispiness, place the chicken on a wire rack on a baking sheet and bake in a 375°F (190°C) oven for 10-15 minutes, or until heated through and crispy again. Avoid the microwave, as it will make the coating soggy.
Absolutely! You can use boneless, skinless chicken breasts, but you will need to reduce the cooking time. Bake for 20-25 minutes at 400°F (200°C), or until the internal temperature reaches 165°F (74°C).
The most crucial step to prevent a soggy bottom is to bake the chicken on a wire rack set inside a baking sheet. This elevates the chicken, allowing hot air to circulate underneath and crisp up the coating instead of letting it steam in its own juices.
Yes, it is significantly healthier than traditional deep-fried chicken. Baking uses far less oil, which dramatically reduces the overall fat and calorie content, making it a much lighter option you can feel good about serving.
The secret is a combination of three things: using Panko breadcrumbs for a lighter, crispier coating, elevating the chicken on a wire rack to allow air circulation for 360-degree crisping, and drizzling with butter or oil to help it ‘fry’ in the oven.
For the best results, you should bake oven fried chicken at a relatively high temperature, 400°F (200°C). This high heat helps the coating set quickly and become golden brown and crispy, mimicking the effects of a deep fryer.
Your New Favorite Chicken Dinner
This Oven Fried Chicken recipe is more than just a meal; it’s a game-changer for anyone who loves crispy chicken but wants a healthier, easier way to make it. We know you’ll love the incredible crunch and juicy flavor. If you make this recipe, please leave a comment below and let us know what you think! We’d love to see your creations, so be sure to share a photo on Pinterest!

Oven Fried Chicken: The Ultimate Guide to Crispy, Juicy Perfection
Achieve the crispiest, juiciest Oven Fried Chicken with this foolproof recipe. Baked, not fried, this healthier version delivers an unbelievably crunchy crust and tender meat every time. Perfect for a family dinner!
Ingredients
Equipment
Instructions
- In a large bowl, whisk together buttermilk, hot sauce, 1 tsp salt, and 1/2 tsp black pepper. Add chicken pieces and toss to coat. Cover and refrigerate for at least 4 hours or overnight.
- Preheat oven to 400°F (200°C). Place a wire rack on a large rimmed baking sheet.
- Set up a breading station with three shallow dishes. In the first, place the flour. In the second, beat the eggs. In the third, combine Panko breadcrumbs, smoked paprika, garlic powder, onion powder, and cayenne pepper.
- Remove one piece of chicken from the buttermilk, letting excess drip off. Dredge in flour, shaking off excess. Dip in the egg to coat completely, then press firmly into the Panko mixture to adhere on all sides.
- Place the coated chicken on the wire rack. Repeat with remaining chicken, ensuring pieces do not touch.
- Drizzle the chicken with melted butter or spray with cooking oil.
- Bake for 40-50 minutes, until the crust is deep golden brown and chicken is cooked through (internal temperature of 165°F for breasts, 175°F for thighs). Let rest for 5 minutes before serving.
Notes
Do not skip the wire rack! This is the most important step for ensuring the bottom of the chicken gets crispy.
Don't overcrowd the pan. Use two baking sheets if necessary to give the chicken space for air to circulate.
For extra flavor, add a teaspoon of dried herbs like thyme or oregano to your Panko mixture.
Oven Fried Chicken: The Ultimate Guide to Crispy, Juicy Perfection
Ingredients
Equipment
Instructions
- In a large bowl, whisk together buttermilk, hot sauce, 1 tsp salt, and 1/2 tsp black pepper. Add chicken pieces and toss to coat. Cover and refrigerate for at least 4 hours or overnight.
- Preheat oven to 400°F (200°C). Place a wire rack on a large rimmed baking sheet.
- Set up a breading station with three shallow dishes. In the first, place the flour. In the second, beat the eggs. In the third, combine Panko breadcrumbs, smoked paprika, garlic powder, onion powder, and cayenne pepper.
- Remove one piece of chicken from the buttermilk, letting excess drip off. Dredge in flour, shaking off excess. Dip in the egg to coat completely, then press firmly into the Panko mixture to adhere on all sides.
- Place the coated chicken on the wire rack. Repeat with remaining chicken, ensuring pieces do not touch.
- Drizzle the chicken with melted butter or spray with cooking oil.
- Bake for 40-50 minutes, until the crust is deep golden brown and chicken is cooked through (internal temperature of 165°F for breasts, 175°F for thighs). Let rest for 5 minutes before serving.
Notes
Don't overcrowd the pan. Use two baking sheets if necessary to give the chicken space for air to circulate.
For extra flavor, add a teaspoon of dried herbs like thyme or oregano to your Panko mixture.